
If you have ever accidentally deleted files that you needed from Windows 7 or Windows Vista, you know the pain of trying to recover the deleted files. The best way to get these files back used to be Norton's UnDelete, but not any more, the best way is to use Phoneix Technologies UndeletePlus. Read on for details on how to get the software, install it, and recover your deleted files.
UndeletePlus from Phoenix Technologies (the guys who make Bios software for your PC) is a great tool for recovering deleted files.
UndeletePlus is a simple to use utility that scans your hard drive for all the files that can be undeleted and attempts to salvage the file for you.
When you tell Windows to erase a file, Windows removes the pointer to the file, but until that spot on the hard disk has been written to the file can still be Undeleted. The sooner you attempt to recover the file the better your chances. Also, smaller size files have a higher chance of being salvaged, and disks that have not been defragmented are better candidates for file recovery.
Undelete Plus does the following:
- Recovers deleted files from NTFS/NTFS5, FAT12/FAT16/FAT32 volumes.
- Restores deleted files on Windows 2000, Windows XP, Windows 98, Windows ME, Windows NT, Windows 2003, Windows Server 2008, Windows Vista, and Windows 7
Undeleting Files:
Download UndeletePlus and Install it.
Complete the following steps to begin the process of recovering deleted files:
1. Open UndeletePlus
2. In the Drives pane, select the drive that you want to scan. This can be a hard drive, digital, camera, USB drive, or another item connected to your system.
Note: To remove drives from the search deselect the checkbox next to that drive. 
3. Click the Start Scan button. ![]()
Running the Search
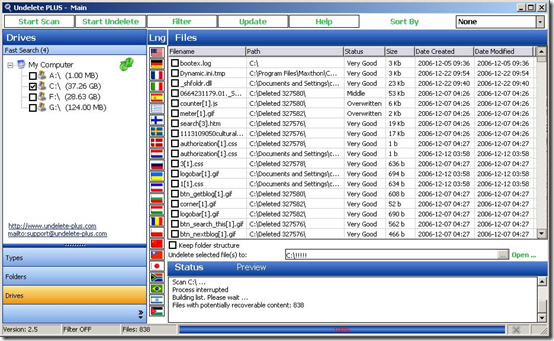
Pressing the Start Scan button causes UndeletePlus to scan your drive for files that can be undeleted, or recovered. ![]()
Once the scan is started the progress bar at the bottom of the window displays the number of files found and proportion of scan remaining. To stop the scan press the Stop button next to the progress bar. Note that the Stop button is only displayed during the scan. If you stop the scan before it is done, UndeletePlus displays a list of files found up until the point at which the scan was stopped. ![]()
Managing the Results
After the scan is completed UndeletePlus has the following information and options for you to use to find the files you want to retrieve: 
1. The Results Screen The Folders window shows the folder structure of files that were recovered. In some situations a folder name is destroyed, in which case the name format is “Deleted XXXXX”.
Note: that sub folders retain their original name.
2. Folders Screen 
Folder: Displays the folder(s) scanned.
File Type: Files found are grouped by file type, and any files that are found that do not belong to a known file type are placed in the “Other Files” folder. When a file type selected, the files found are displayed in the “Results Screen”. You can sort the files in this window by clicking on the column headings. When you click on a file name its contents are displayed in the Preview window.
To list all files found, click on “My Computer” either in the “File Types” or “Folder” screen.
3. Status and Preview 
Status: The Status window contains overhead information.
Preview: If a preview is available, a thumbnail image is displayed.
Saving Recovered Files
When UndeletePlusâ„¢ saves a restored file it reads its content and then writes it to a new file with the same name. It is recommended that you save the files that you are recovering to another disk because of the risk of overwriting other files that you want to recover with the newly recovered saved file.
IMPORTANT! To minimize the chance of corrupting any remaining lost files, do not to save the retrieved files back to the same hard drive until after completing all attempts to retrieve any lost files.
Complete the following steps to retrieve a deleted file:
1. In the “Results Screen” select the check box of the file or files to be retrieved. 
To select all files, right click on Filename then select Select AllItems from the menu.
2. Press the Start Undelete button to recover the selected files. ![]()
3. Press the Yes button in the “Possible Data Loss” pop up box. 
Recovered files go to the folder specified by Undelete selected file(s) to: section. ![]()

[Via]